Understanding and Fixing Display Hiccups in Windows 11 System
Deciphering and Resolving Error 0X80070091 for Successful System Restores in Windows 11 - Expert Tips

A lot Windows 10 users reported that system restore did not complete successfully. And the problem pop-uped asError 0x80070091shown as image above. It’s a good thing that Microsoft has noticed this error and will update this thread soon. However, if you are Windows 10 Advanced user, you can fix it right now via the methods below. If you’ve faced it, just go with the easy fixes below.
Fix One. Rename the WindowsApps folder in Safe Mode
Boot your Windows 10 into safe mode:
How to:
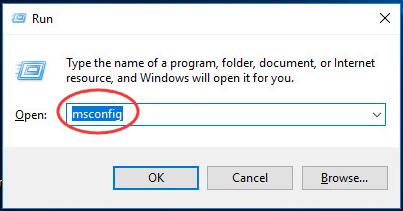
a)
Open run dialog box by pressingWindows key + R key together.
Then type msconfig in the box and hit Enter.
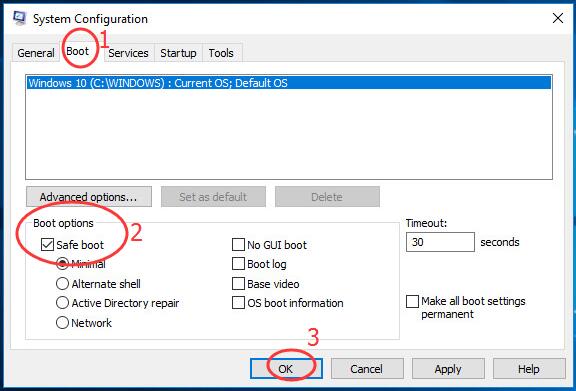
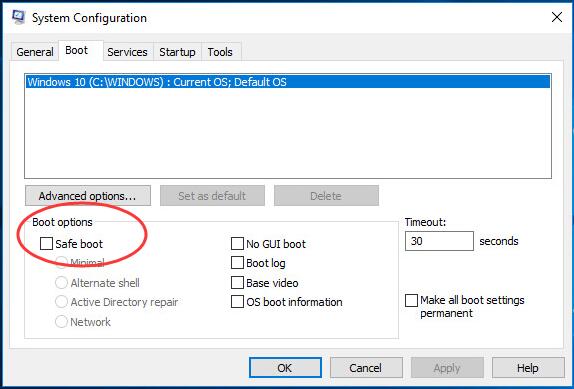
b)
On the pop-up window, view on Boot pane.
Then tick on Safe bootand click OK.
Click Restart, if prompted by system configuration
Then your Windows 10 would get into safe mode.
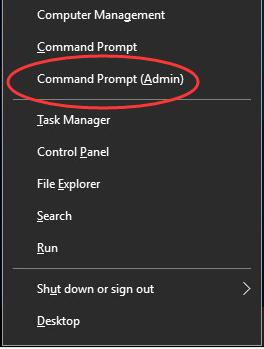
Open quick-access menu by pressing Windows key + X key.
Then click Command Prompt(Admin) to run it as administrator.
When prompted by User Account Control, click Yes.
Type the following commands and hit Enter to run them one by one:
• cd C:\Program Files
• takeown /f WindowsApps /r /d Y
• icacls WindowsApps /grant “%USERDOMAIN%\%USERNAME%”:(F) /t
• attrib WindowsApps -h
• rename WindowsApps WindowsApps.old
Follows the a) & b) of Step 1 to openSystem ConfigurationWindow.
This time uncheck Safe boot to reboot your Windows 10.
When it finish rebooting, run System Restore again.
Fix Two. Rename the WindowsApps folder in WinRE
Boot your Windows 10 into WinRE(Windows Recovery Environment)
How to:
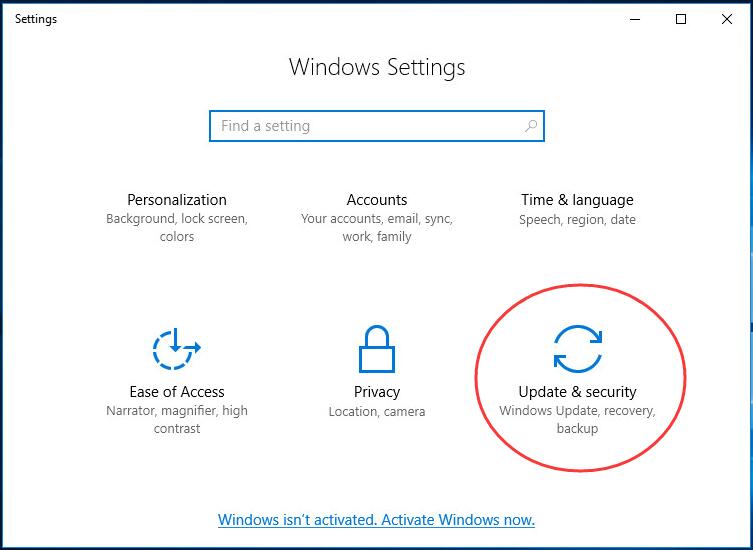
a)
Open Settings Window by pressing Windows key + I key.
Then click Update & security.
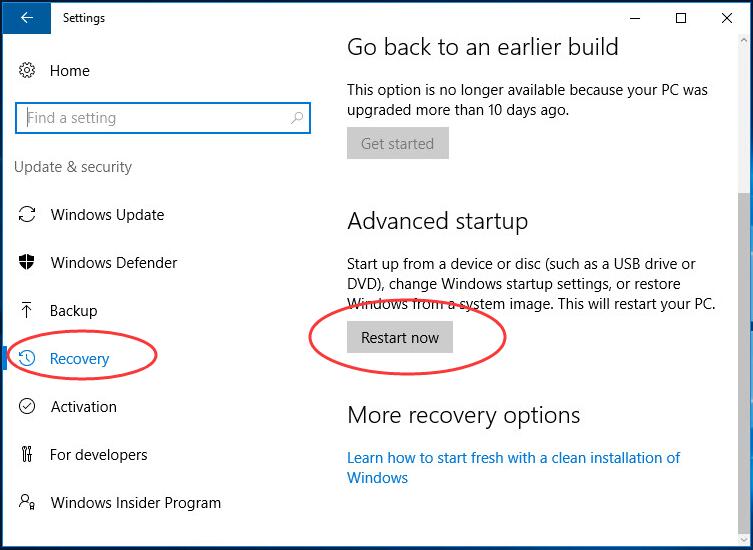
b)
Click Recovery.
Then scroll down on the right side and click Restart now under Advanced startup .
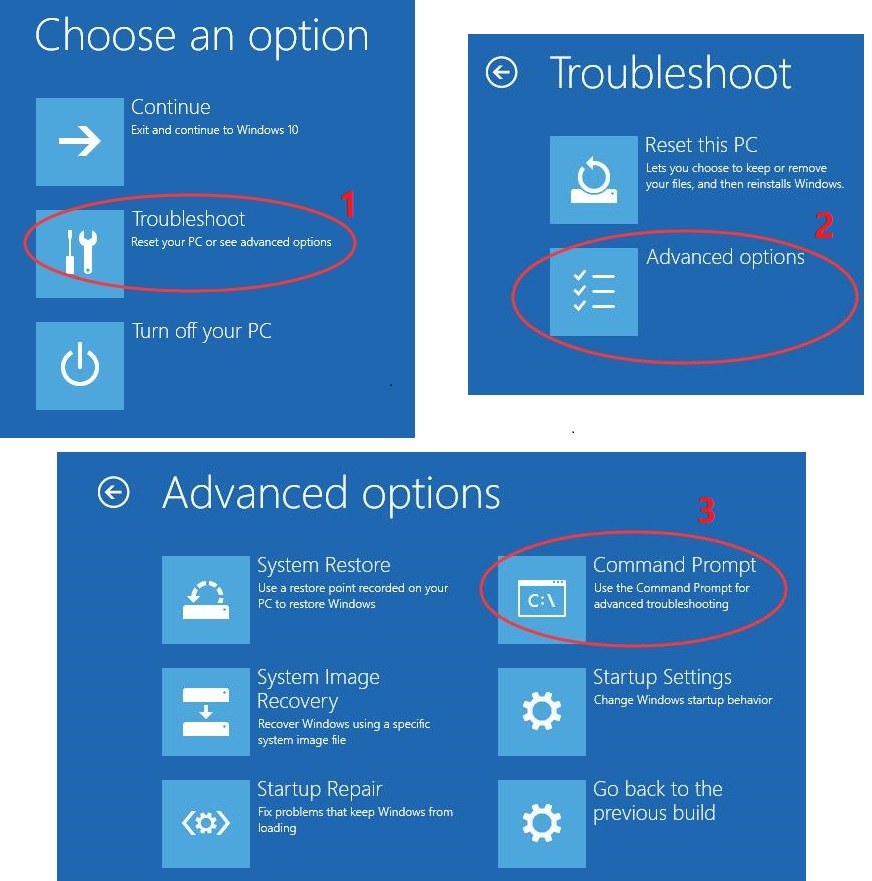
c)
ClickTroubleshoot > Advanced >Command Prompt.
Type the following commands and hit Enter to run them one by one:
• cd C:\Program Files
• attrib WindowsApps -h
• rename WindowsApps WindowsApps.old
Reboot your Windows 10, then run System Restore again.
That’s it!
Also read:
- [Solved] Computer Shuts Down While Gaming | Windows 11, 10, 7, 8.1 & 8.
- [Updated] 2024 Approved Economic Guide to Capturing Virtual Learning Spaces
- [Updated] 4 Essential Methods for File Delivery to PC
- Comprehensive Steps to Fix Your PC's Inability to Load Operating System at Startup
- Expert Advice: Repairing 'Power Surge' Warnings in USB Ports While Using Windows 10
- How to Resolve the 'Invalid Directory Name' Error Message
- In 2024, Efficient File Transformation in VLC From MP4 to Various Formats
- Integrating Music Into Unboxing Videos A Comprehensible Manual
- Mastering Android Device Manager The Ultimate Guide to Unlocking Your Oppo Find N3 Device
- Professional Strategies for Editing Full Spherical Video in Premiere
- Quick Solutions: Resolve the Persistent Windows Update Error Code 0X80070652
- Reclaim Missing Touchpad From Device Manager!
- Solving the Problem of Non-Launching 2024 Finals: Effective Strategies & Expert Advice
- Unlocking Apple iPhone 15 Lock Screen 3 Foolproof Methods that Actually Work
- Title: Understanding and Fixing Display Hiccups in Windows 11 System
- Author: Ronald
- Created at : 2024-12-03 18:18:21
- Updated at : 2024-12-10 19:06:19
- Link: https://common-error.techidaily.com/understanding-and-fixing-display-hiccups-in-windows-11-system/
- License: This work is licensed under CC BY-NC-SA 4.0.