
Troubleshooting and Repairing Mousepads for Your Laptop Under Windows Operating Systems (Win11/Win8/Win7)
Troubleshooting and Correcting Error 0X80070091 During Windows 11 System Restore - Solved

A lot Windows 10 users reported that system restore did not complete successfully. And the problem pop-uped asError 0x80070091shown as image above. It’s a good thing that Microsoft has noticed this error and will update this thread soon. However, if you are Windows 10 Advanced user, you can fix it right now via the methods below. If you’ve faced it, just go with the easy fixes below.
Fix One. Rename the WindowsApps folder in Safe Mode
Boot your Windows 10 into safe mode:
How to:
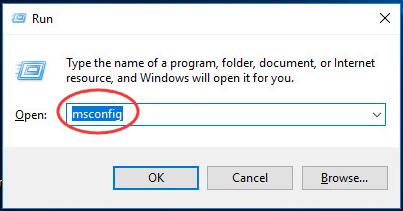
a)
Open run dialog box by pressingWindows key + R key together.
Then type msconfig in the box and hit Enter.
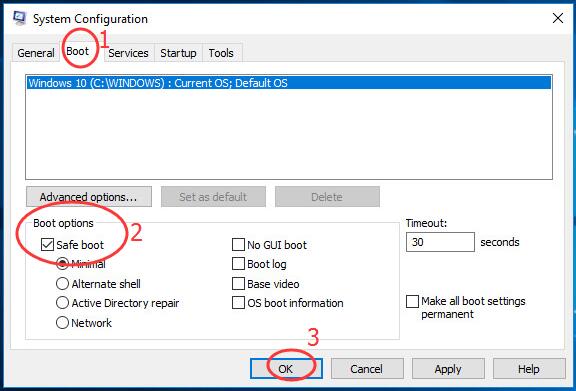
b)
On the pop-up window, view on Boot pane.
Then tick on Safe bootand click OK.
Click Restart, if prompted by system configuration
Then your Windows 10 would get into safe mode.
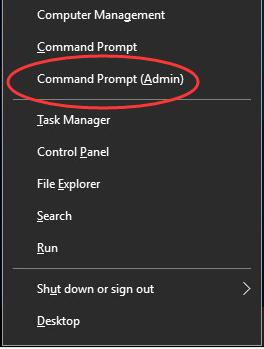
Open quick-access menu by pressing Windows key + X key.
Then click Command Prompt(Admin) to run it as administrator.
When prompted by User Account Control, click Yes.
Type the following commands and hit Enter to run them one by one:
• cd C:\Program Files
• takeown /f WindowsApps /r /d Y
• icacls WindowsApps /grant “%USERDOMAIN%\%USERNAME%”:(F) /t
• attrib WindowsApps -h
• rename WindowsApps WindowsApps.old
Follows the a) & b) of Step 1 to openSystem ConfigurationWindow.
This time uncheck Safe boot to reboot your Windows 10.
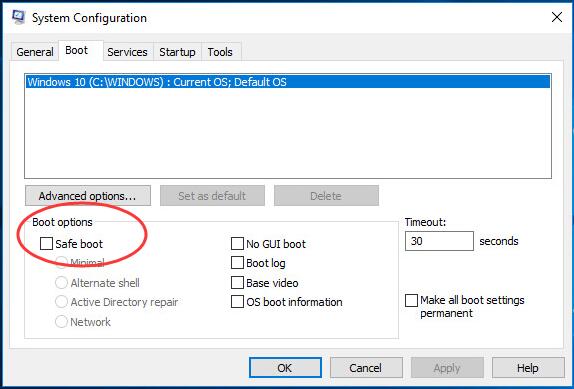
When it finish rebooting, run System Restore again.
Fix Two. Rename the WindowsApps folder in WinRE
Boot your Windows 10 into WinRE(Windows Recovery Environment)
How to:
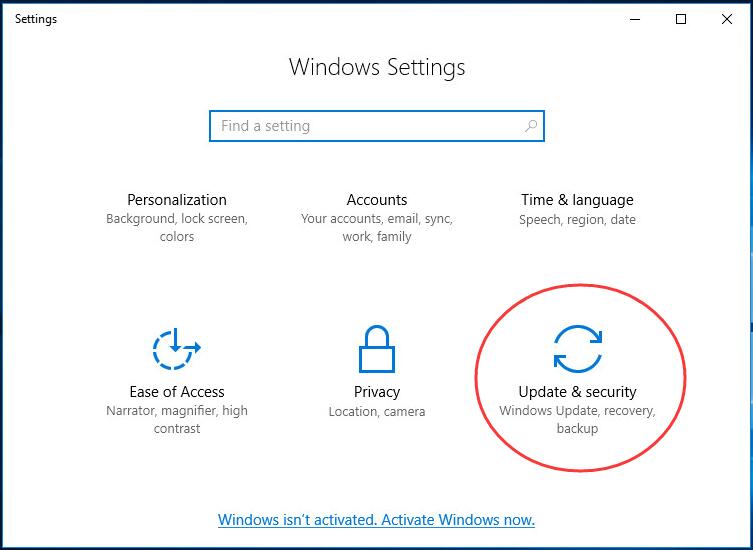
a)
Open Settings Window by pressing Windows key + I key.
Then click Update & security.
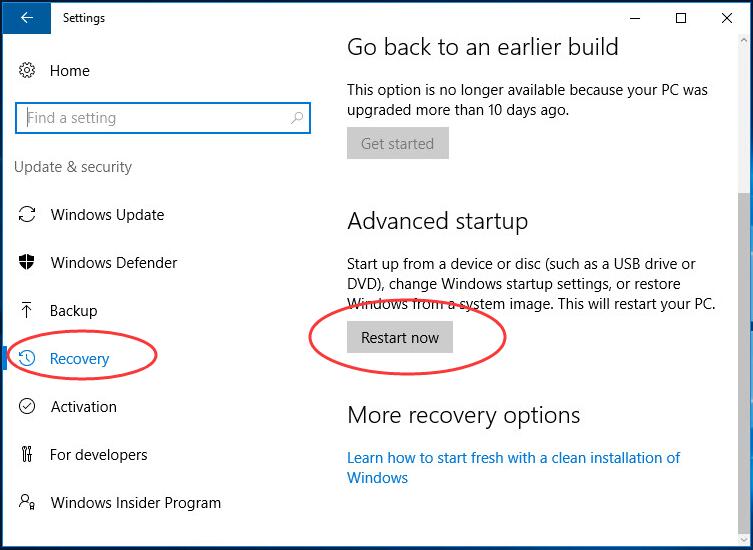
b)
Click Recovery.
Then scroll down on the right side and click Restart now under Advanced startup .
c)
ClickTroubleshoot > Advanced >Command Prompt.
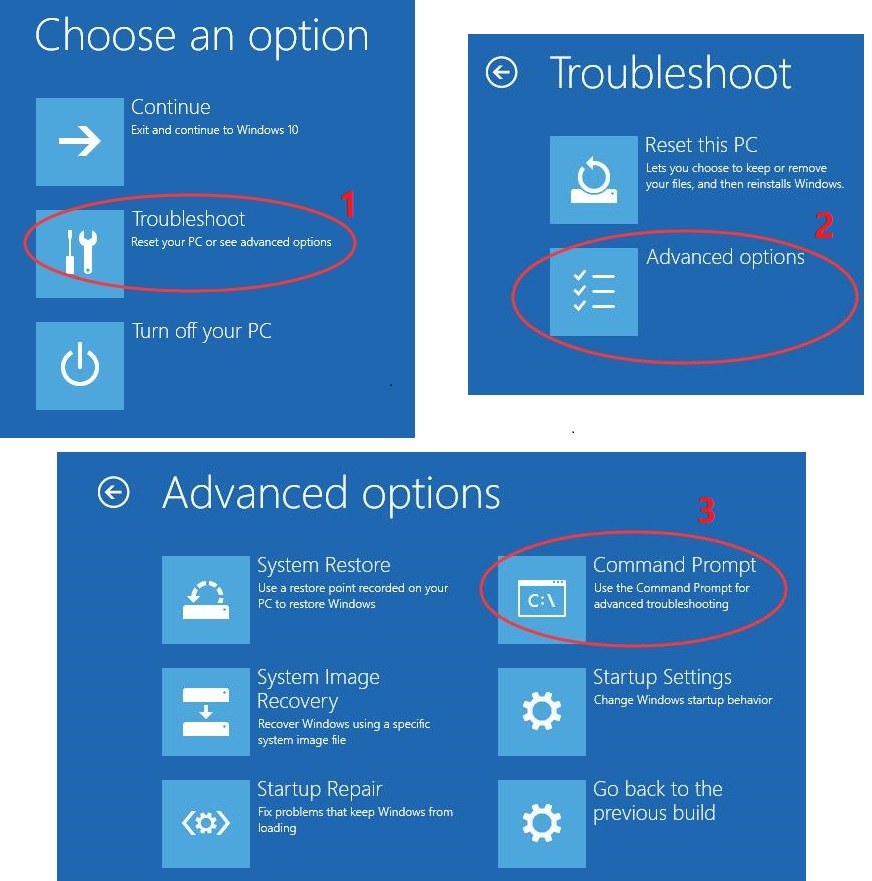
Type the following commands and hit Enter to run them one by one:
• cd C:\Program Files
• attrib WindowsApps -h
• rename WindowsApps WindowsApps.old
Reboot your Windows 10, then run System Restore again.
That’s it!
Also read:
- [Updated] 2024 Approved Enhance Engagement with These Essential FreeGame Hashtags for YouTube
- 6 Proven Ways to Unlock Tecno Phone When You Forget the Password
- Application Stops Due to DLL Absence
- Comprehensive Fixes for The binkw32.dll File Not Present Error
- Ensuring Seamless Operation: Addressing Driver Mismatches in the FTDI System
- How to Fix It: Tips and Solutions When Your Torrent Isn't Downloading as Expected
- How to Fix Windows Update When It Gets Stuck on 100% - SOLUTION
- How to Transfer Text Messages from Honor Magic 6 to New Phone | Dr.fone
- In 2024, How to Detect and Remove Spyware on Honor 100 Pro? | Dr.fone
- In 2024, Ways to stop parent tracking your Infinix Zero 30 5G | Dr.fone
- Logitech Mouse Scroll Troubles: Easy Fixes and Solutions
- Overcoming Non-Charging Difficulties: Essential Tips for Your Surface Device
- Regaining Normal Enter Behavior on Windows
- Streaming Wars The Digital Platform Showdown
- Troubleshooting Guide: Fixing Minecraft Local Area Network (LAN) Connection Issues
- Unraveling the Mystery: Identifying Reasons for Spontaneous PC Restarts - Expert Advice From YL Computing
- Upgrade to the New RTX 2060 Driver - Optimized for All Windows Versions!
- Title: Troubleshooting and Repairing Mousepads for Your Laptop Under Windows Operating Systems (Win11/Win8/Win7)
- Author: Ronald
- Created at : 2025-01-03 00:36:49
- Updated at : 2025-01-04 03:28:46
- Link: https://common-error.techidaily.com/troubleshooting-and-repairing-mousepads-for-your-laptop-under-windows-operating-systems-win11win8win7/
- License: This work is licensed under CC BY-NC-SA 4.0.