
Troubled by the 0X80072EFD Mistake on Your PC? Here’s How to Resolve It!
Destiny the Second Server Problems? Here’s How to Resolve Them Efficiently
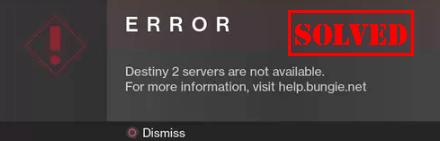
Having an error on Destiny 2 saying:Destiny 2 servers are not available? Don’t worry. This is a common Destiny server issue and you can fix servers not available in Destiny 2. Why is Destiny 2 server unavailable? It’s very likely that too many people connect to the servers at the same time period, and the servers are overloading. So you can’t currently connect to the server and get the servers unavailable error. In addition, the network problems in your computer can also result in the error. But the good news is, this is not a difficult issue to resolve.
Try these fixes
Here are some solutions that have helped people resolve the error “Destiny 2 servers are not available”. You don’t need to try them all; just work your way down the list until everything’s working again.
- Connect to the Destiny 2 server in another time
- Disable DHCP for your connection
- Use the Ethernet connection
- Update your network card driver
Note: the screenshots below come from Windows 10, and fixes apply to Windows 8 and Windows 7.
Fix 1: Connect to the Destiny 2 server in another time
It’s possible that too many people connect to the Destiny servers during the time period, so the servers are overloading and you will fail to connect. So you can wait for a while and try playing the game in another time. This issue can be automatically fixed. If you still have the error “Destiny 2 servers are not available”, don’t worry. There’s something else to try.
Fix 2: Disable DHCP for your connection
If you’re connecting via WiFi, you’re more likely to have the servers not available error in Destiny 2. So you can try disabling DHCP in your computer to fix your problem. To do so:
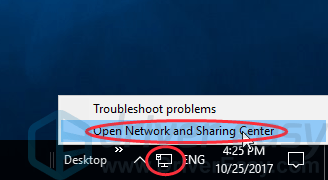
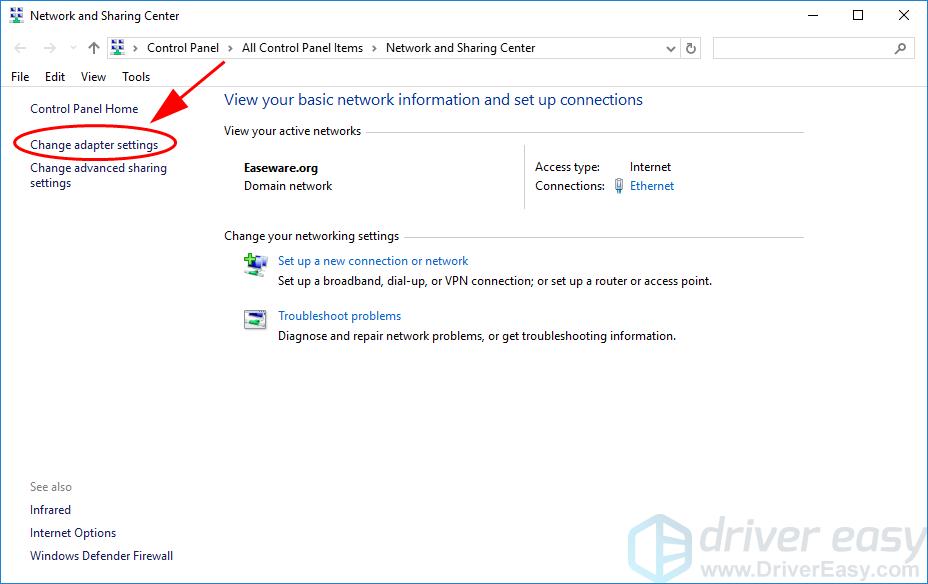
- Right click on thenetwork icon at the bottom right corner on your desktop, and clickOpen Network and Sharing Center .
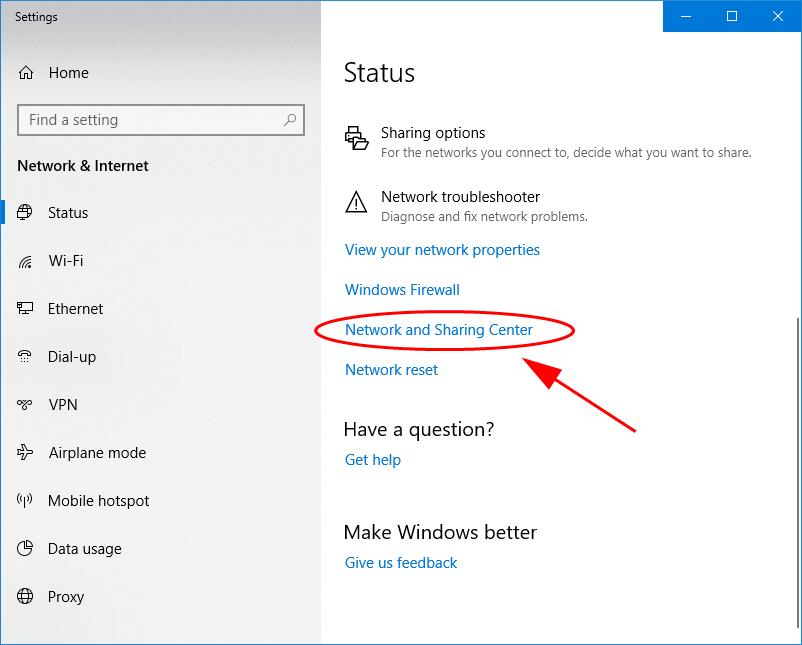
 If you don’t see “Open Network and Sharing Center ” there, you can clickOpen Network and Internet settings , then clickNetwork and Sharing Center inSettings .
 - ClickChange adapter settings on the left.
 If you don’t see “Open Network and Sharing Center ” there, you can clickOpen Network and Internet settings , then clickNetwork and Sharing Center inSettings .
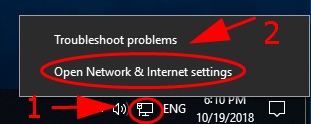
3. Right click on theconnection you’re currently using, and clickProperties .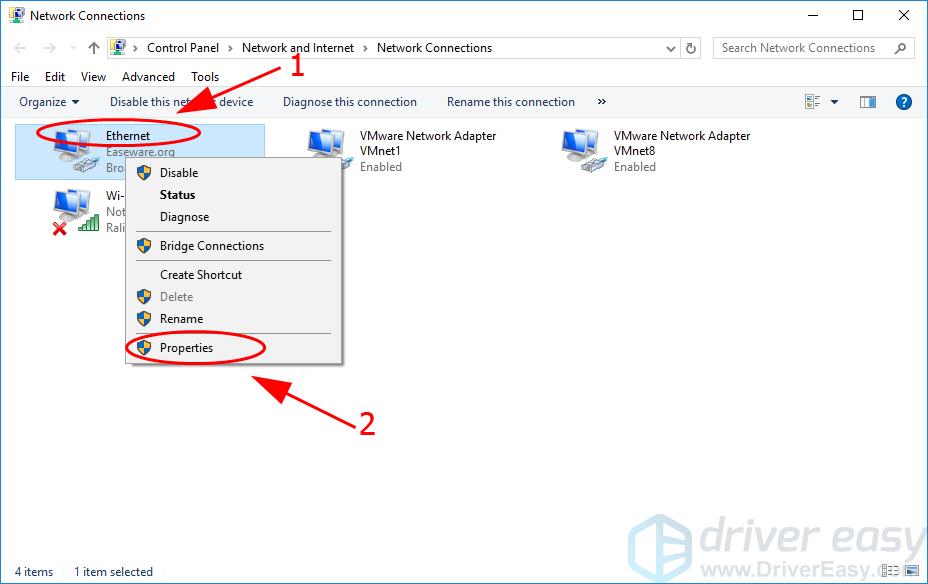
4. Double clickInternet Protocol Version 4 (TCP/IPv4) .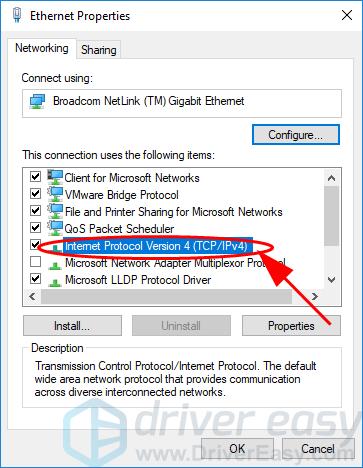
5. In the new popup pane, select “Use the following IP address ” and “Use the following DNS server addresses “. Then enter the IP address and DNS server addresses manually. ClickOK to save.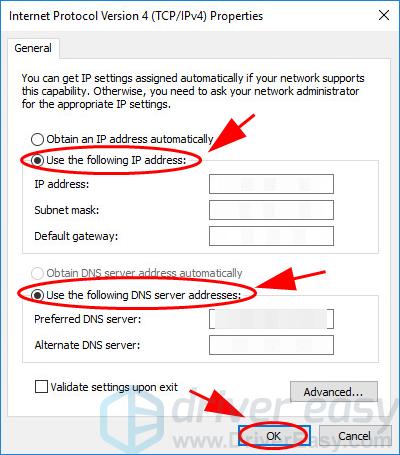
6. Restart your computer and open Destiny 2 to see if it works.
It should have fixed the server issues in Destiny 2. If not, don’t be upset. You can try the following solutions.
Fix 3: Use the Ethernet connection
It’s recommended to use the Ethernet connection, since playing games like Destiny 2 requires a more stable and faster Internet connection. So you can switch to theEthernet connectionon your computer to see if it works. If you want to use the WiFi connection, or there’s no Ethernet connection available, try these steps to force your computer (and Destiny 2 included) to connect via WiFi.
- Right click on thenetwork icon at the bottom right corner on your desktop, and clickOpen Network and Sharing Center . If you don’t see “Open Network and Sharing Center ” there, you can clickOpen Network and Internet settings , then clickNetwork and Sharing Center inSettings .
- ClickChange adapter settings on the left.
- Right click on theconnections that you’re not using, and selectDisable .
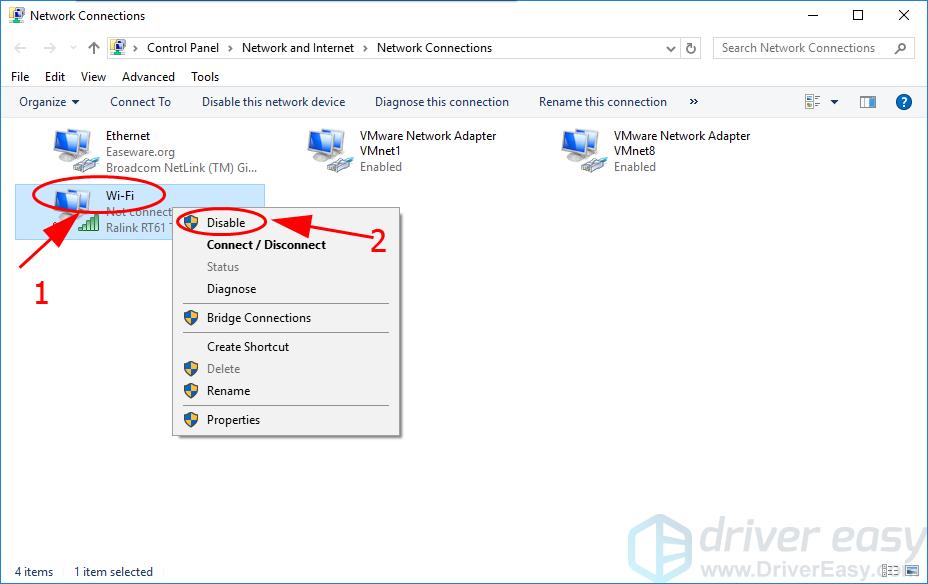
You’ll need to repeat this step for any other connections that you’re not using.
4. Now your computer will only use the connection via WiFi. Restart the game and see if it works.
Still no luck? Ok, there’s one more thing to try.
Fix 4: Update your network card driver
A missing or outdated network card driver will cause connection issues in your computer, so you should keep the network card driver up to date. There are two ways to update the network card driver:manuallyandautomatically.Manually update the driver– You can go to the manufacturer’s website of your network card, then download and install the latest correct driver into your computer. Be sure to download the one that is compatible with the Windows OS running in your computer. This requires time and computer skills.Automatically update the driver– If you don’t have time or patience, you can do it automatically with Driver Easy . Driver Easy will automatically recognize your system and find the correct drivers for it. You don’t need to know exactly what system your computer is running, you don’t need to risk downloading and installing the wrong driver, and you don’t need to worry about making a mistake when installing. You can update your drivers automatically with either theFREEor theProversion of Driver Easy. But with the Pro version it takes just 2 clicks (and you get full support and a30-day money back guarantee):
- Download and install Driver Easy.
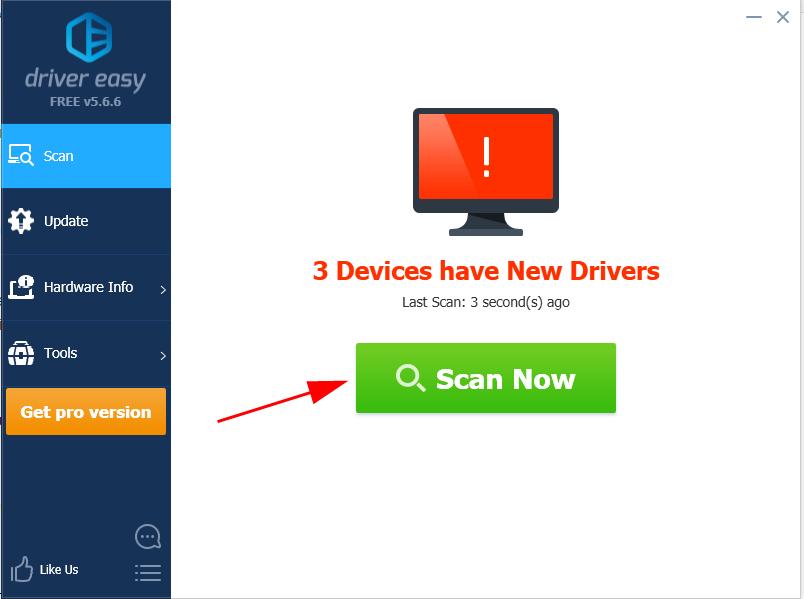
- Run Driver Easy and click theScan Now button. Driver Easy will then scan your problem drivers.
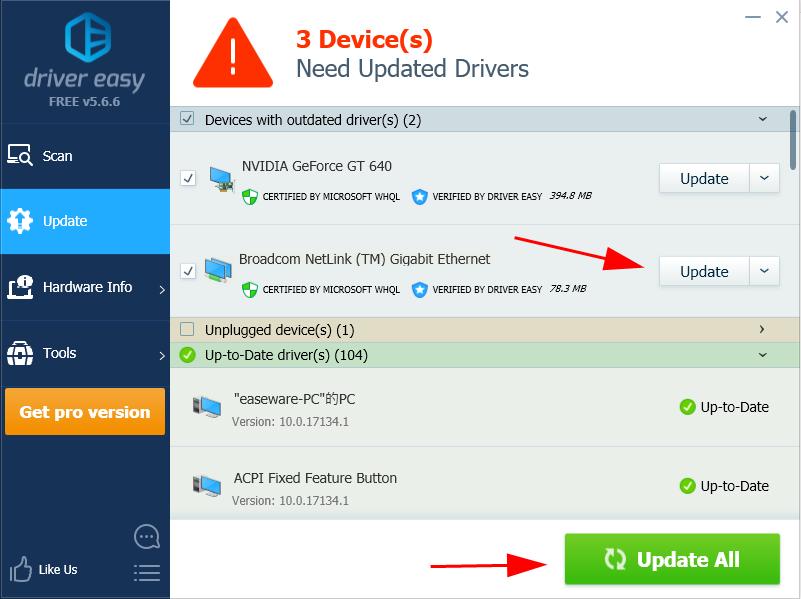
- Click theUpdate button next to the flagged network adapter to automatically download the correct version of this driver (you can do this with theFREE version), then install the driver.Or clickUpdate All to automatically download and install all the drivers that are missing or outdated (this requires the Pro version – you’ll be prompted to upgrade when you clickUpdate All ).
- Restart your computer to take effect.
Open Destiny 2 and see the servers not available error has been removed.
So there you have it – the four effective ways to fix “Destiny 2 servers are not available” in your computer. Feel free to leave a comment below if you have any questions.
Also read:
- [Updated] Elite Gamers' Capturing Solutions for 2024
- 2024 Approved Analyzing Channels Monetization Status at a Glance
- Ideal 10 Video Editing Software for Windows/PC TikToks
- In 2024, 15 Best Strongest Pokémon To Use in Pokémon GO PvP Leagues For Realme GT 5 | Dr.fone
- In 2024, Strategic Boxes Opened Marketing Excellence
- Rebooting Woes: Windows 10 Troubleshooting
- Repairing Internal Camera Glitches in Microsoft Windows: A Comprehensive How-To
- Solve Unresponsive Laptop Mouse Problems with Simple USB Fixes
- The Ultimate Guide to Resolving Windows 10/11 Sound Failures: Dealing with Missing Audio Devices
- Transformation | Free Book
- Troubleshoot and Optimize Your File Explorer in Windows 10 Today
- Troubleshooting Guide: Resolving Undetected Device Issues with Bluetooth in Windows 11
- Updated How to Stream on Twitch The Ultimate Guide
- Winning Against WerFault.exe Issues on Windows: Six Essential Hacks and Tweaks for Better Stability
- ZDNet's Top Strategies for Using iMessage with Your Windows Computer
- Title: Troubled by the 0X80072EFD Mistake on Your PC? Here’s How to Resolve It!
- Author: Ronald
- Created at : 2025-01-19 21:48:11
- Updated at : 2025-01-22 18:35:12
- Link: https://common-error.techidaily.com/troubled-by-the-0x80072efd-mistake-on-your-pc-heres-how-to-resolve-it/
- License: This work is licensed under CC BY-NC-SA 4.0.