Error Code 0X80e91ac3 Decoded: Cleaning and Repairing a Dirty Disk in Windows Systems
Troubleshooting Guide: Starting the Hosted Network in Windows 10 Fixed
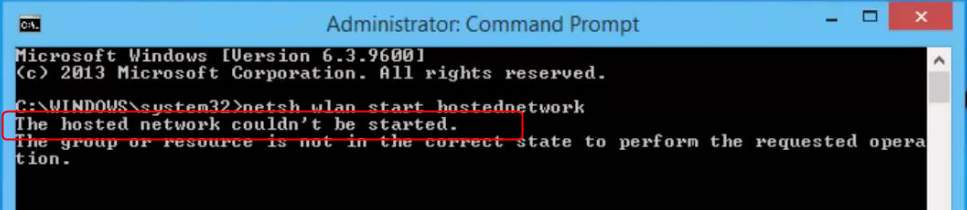
“The hosted network couldn’t be started ” error may occur when you set up WiFi hotspot via command prompt. The issue is very likely due to your WiFi network adapter. But no worry! We’ve got the answer for you. In this post, we will be showing you the tried-and-true methods to fix “The hosted network couldn’t be started” error on Windows 10. Read along please.
Disclaimer: This post includes affiliate links
If you click on a link and make a purchase, I may receive a commission at no extra cost to you.
Try these fixes
- Enable Microsoft Hosted Network Virtual Adapter
- Check your wireless network adapter
- Update your WiFi driver
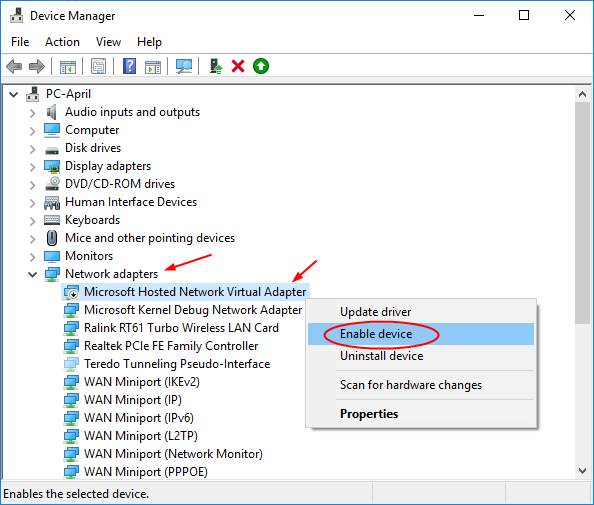
Method 1. Enable Microsoft Hosted Network Virtual Adapter
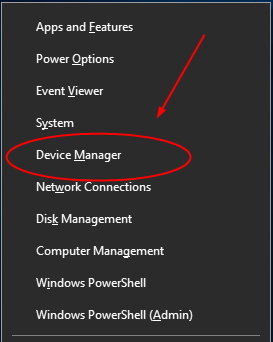
1)PressWindows key +X key together to open quick-access menu.
ClickDevice Manager to open it.
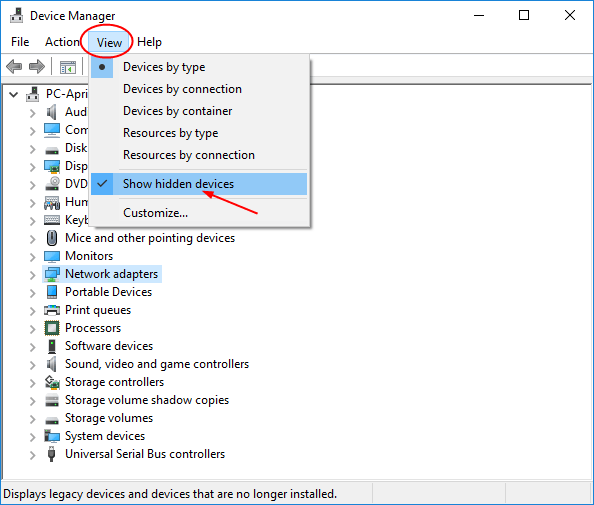
2)ClickView icon and tick onShow hidden devices .
3)Find and expandNetwork adapters dialog.
Then right-click onMicrosoft Hosted Network Virtual Adapter to chooseEnable device .
4)Now set your WiFi hotspot again to see if the error has been fixed.
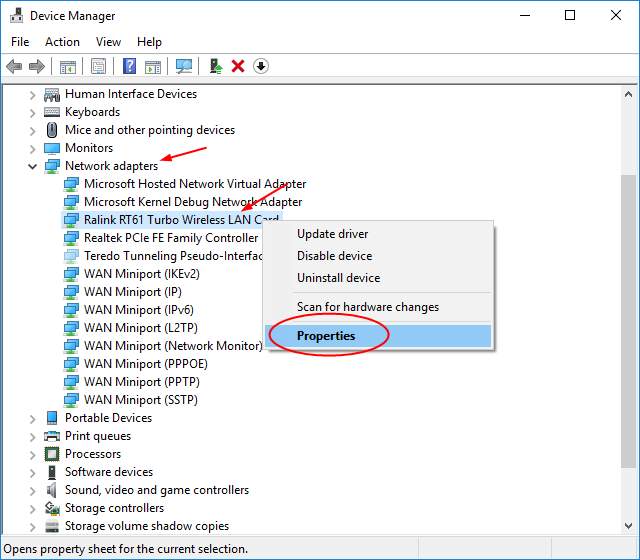
Method 2. Check your wireless network adapter
1)Followstep 1 in Method 1 to open Device Manager.
2)Find and expandNetwork adapters dialog.
Then right-click on your wireless network adapter to chooseProperties .
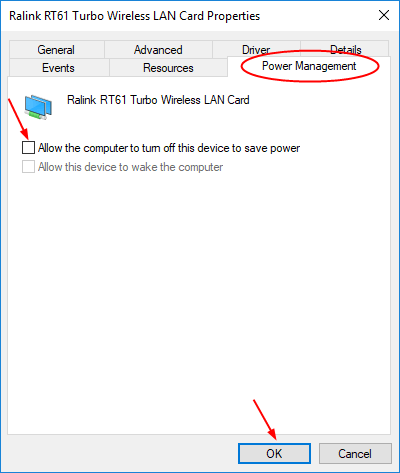
3)View onPower Management pane.
Make sureAllow the comoputer to turn off this device to save power isunchecked and clickOK to save settings.
If unluckily, neither method 1 nor method 2 helps you fix the error, it’s advise that update your WiFi driver with Method 3.
Method 3. Update your WiFi driver
It is very important to update your WiFi drivers, because the wrong or outdated drivers may cause problems.
There are two ways you can update your driver:manually andautomatically (Recommend) .
Option 1 – Manually
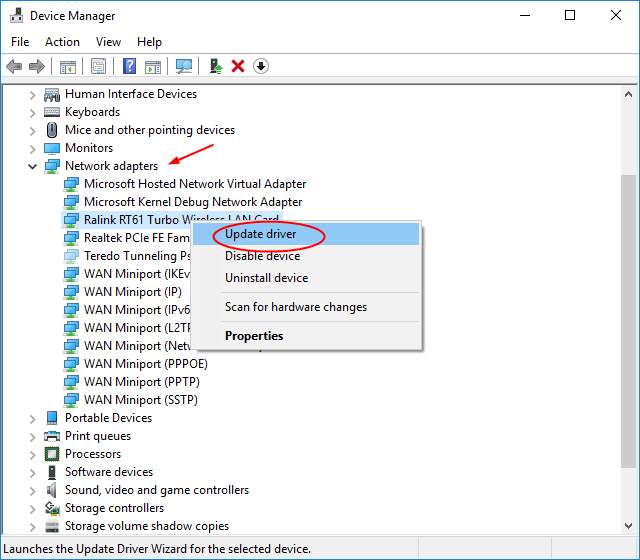
Followstep 1 in Method 1 to open Device Manager.
Find and expand theNetwork adapters . Right-click on your wireless network adapter in Device Manager.
Then chooseUpdate driver .
- ClickSearch automatically for updated driver software .
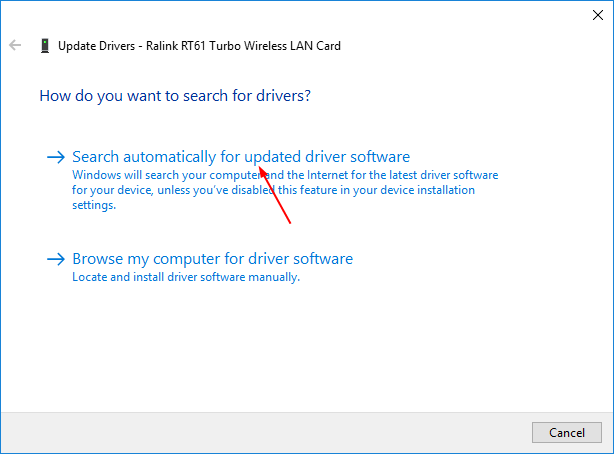
Now Microsoft will detect the update for you automatically.
However, for some reason, Microsoft cannot always find the update for you. If you receive the message:The best driver software for your device is already installed , please try the next method to update the driver.
Option 2 – Automatically
This is the quickest and easiest option. It’s all done with just a couple of mouse clicks – easy even if you’re a computer newbie.
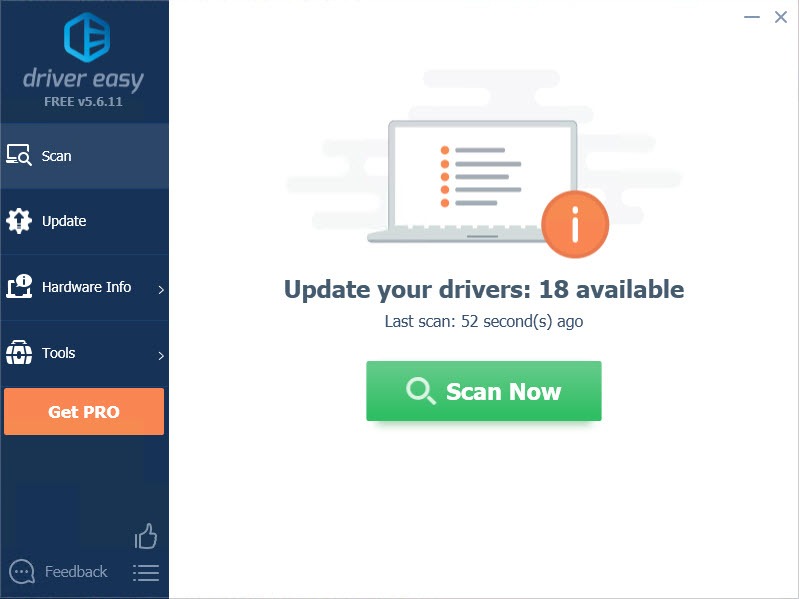
Driver Easy will automatically recognize your system and find the correct drivers for it. You don’t need to know exactly what system your computer is running, you don’t need to risk downloading and installing the wrong driver, and you don’t need to worry about making a mistake when installing.
You can update your drivers automatically with either the FREE or the Pro version of Driver Easy. But with the Pro version it takes just 2 clicks (and you get full support and a 30-day money back guarantee ):
- Download and install Driver Easy.
- Run Driver Easy and click the Scan Now button. Driver Easy will then scan your computer and detect any problem drivers.

- Click the Update button next to the flagged driver to automatically download the correct version of that driver, then you can manually install it (you can do this with the FREE version).
Or click Update All to automatically download and install the correct version of all the drivers that are missing or out of date on your system. (This requires the Pro version which comes with full support and a 30-day money back guarantee. You’ll be prompted to upgrade when you click Update All.)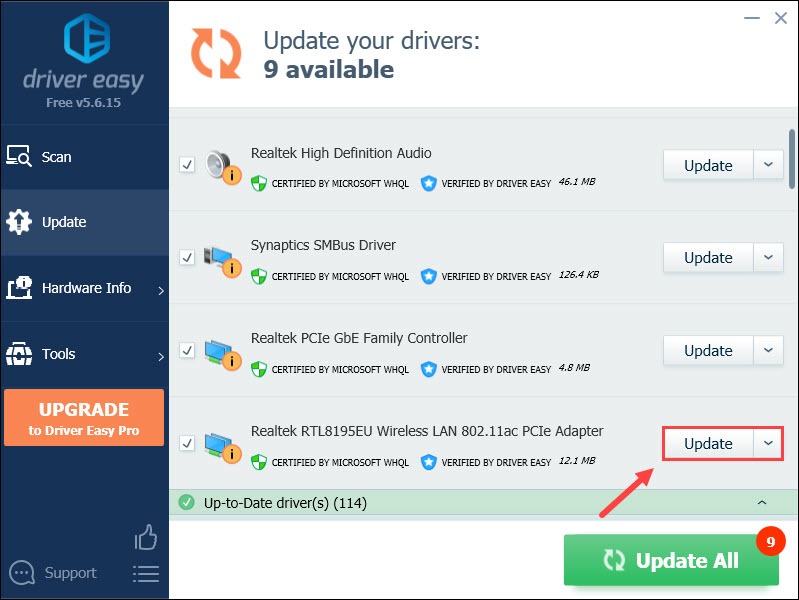
The Pro version of Driver Easy comes with full technical support.
If you need assistance, please contact Driver Easy’s support team at [email protected] .
After updating your driver, reboot Windows 10 to make the new driver take effect. Set your WiFi hotspot again to see if it works.
Did you solve the problem? Which method worked for you? Feel free to comment below to share with your own experiences and let me know if you have any question.
Also read:
- [New] 2024 Approved Accompanying Audio WhatsApp Statement Boost
- [Updated] 2024 Approved Gripping Phrase Generator Device
- [Updated] Pioneering Personalized Voices on PS Games
- 2024 Approved Understanding AV1 Your Initial Compre Point
- Choosing Between Roku and Chromecast: A Detailed Comparison for Enthusiasts
- Effective Ways To Fix Checkra1n Error 31 On iPhone XS Max
- Error Code 0X800F081F and the .NET Framework 3.5: Comprehensive Troubleshooting Tips for Windows Users
- Guide to Restoring Connection: Microsoft Wireless Display Adapter in Windows 11
- How Will AMD’s New Anti-Aliasing Solution, FSR 3 Compete with NVIDIA's DLSS 3.5?
- ICUE Troubleshooting Guide: Correcting Undetected Hardware Issues
- Maximierung Der Nutzenfaktoren Von SharePoint Bei Der National Park Authority Mit ABBYY
- Overcome 'Unregistered Class Errors' In Windows 10: Expert Solutions and Tips
- Resolving Windows 10 Stuck Situations: A Comprehensive Guide
- Solving Sync Problems for Your Xbox One Controller: Easy Fixes & Tips for Gaming Seamlessly
- Thinking About Changing Your Netflix Region Without a VPN On Samsung Galaxy F54 5G? | Dr.fone
- Troubleshooting 'Cannot Locate Resources' In Overwatch - Expert Advice
- Troubleshooting Keyboard Latency on Your Windows 11 PC: Solved
- Unexpected Shutdown Issues: How I Solved My Computer's Mysterious Power-Off Problem
- Upgrade Your Game View: Tutorial to Correct Blurring Issues in COD: Warzone for Windows
- Title: Error Code 0X80e91ac3 Decoded: Cleaning and Repairing a Dirty Disk in Windows Systems
- Author: Ronald
- Created at : 2025-01-27 20:09:42
- Updated at : 2025-01-29 21:56:01
- Link: https://common-error.techidaily.com/error-code-0x80e91ac3-decoded-cleaning-and-repairing-a-dirty-disk-in-windows-systems/
- License: This work is licensed under CC BY-NC-SA 4.0.