
Easy Steps to Correctly Address Stop Work Order for Windows Host Process Using Rundll32
Deciphering and Resolving Error 0X80070091 for Successful System Restores in Windows 11 - Expert Tips

A lot Windows 10 users reported that system restore did not complete successfully. And the problem pop-uped asError 0x80070091shown as image above. It’s a good thing that Microsoft has noticed this error and will update this thread soon. However, if you are Windows 10 Advanced user, you can fix it right now via the methods below. If you’ve faced it, just go with the easy fixes below.
Disclaimer: This post includes affiliate links
If you click on a link and make a purchase, I may receive a commission at no extra cost to you.
Fix One. Rename the WindowsApps folder in Safe Mode
Boot your Windows 10 into safe mode:
How to:
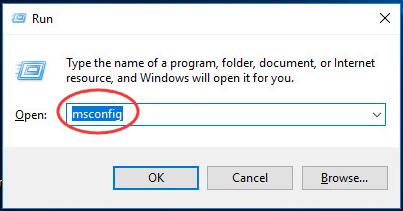
a)
Open run dialog box by pressingWindows key + R key together.
Then type msconfig in the box and hit Enter.
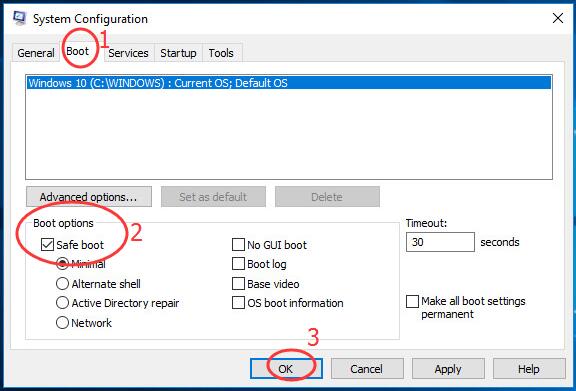
b)
On the pop-up window, view on Boot pane.
Then tick on Safe bootand click OK.
Click Restart, if prompted by system configuration
Then your Windows 10 would get into safe mode.
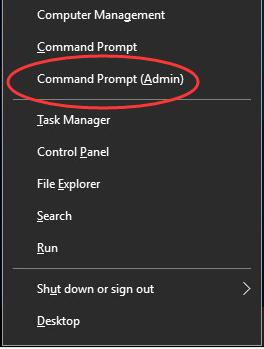
Open quick-access menu by pressing Windows key + X key.
Then click Command Prompt(Admin) to run it as administrator.
When prompted by User Account Control, click Yes.
Type the following commands and hit Enter to run them one by one:
• cd C:\Program Files
• takeown /f WindowsApps /r /d Y
• icacls WindowsApps /grant “%USERDOMAIN%\%USERNAME%”:(F) /t
• attrib WindowsApps -h
• rename WindowsApps WindowsApps.old
Follows the a) & b) of Step 1 to openSystem ConfigurationWindow.
This time uncheck Safe boot to reboot your Windows 10.
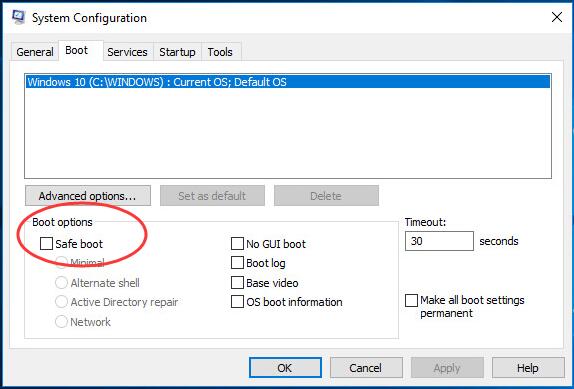
When it finish rebooting, run System Restore again.

Fix Two. Rename the WindowsApps folder in WinRE
Boot your Windows 10 into WinRE(Windows Recovery Environment)
How to:
a)
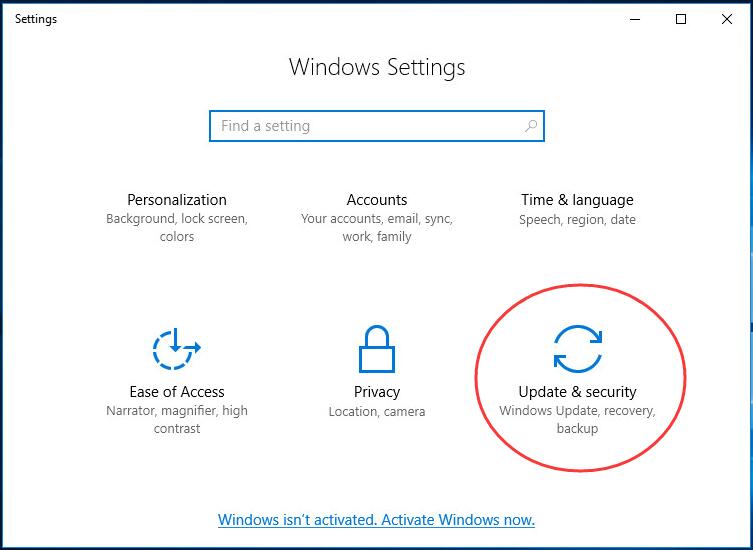
Open Settings Window by pressing Windows key + I key.
Then click Update & security.
b)
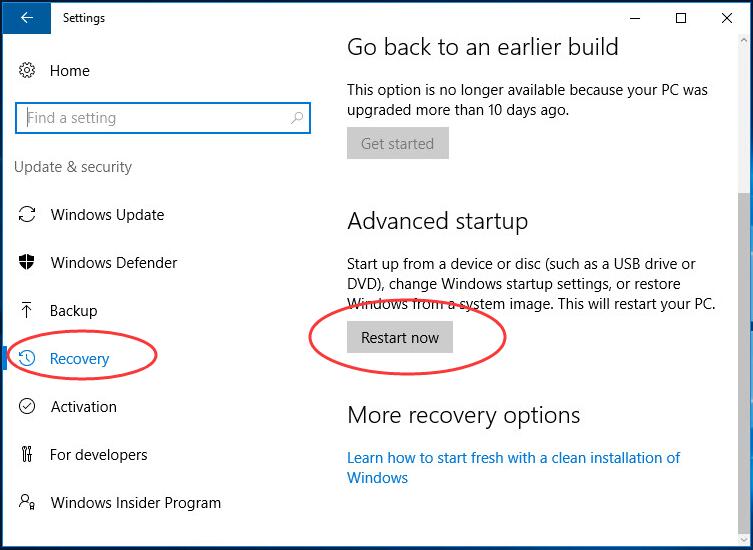
Click Recovery.
Then scroll down on the right side and click Restart now under Advanced startup .
c)
ClickTroubleshoot > Advanced >Command Prompt.
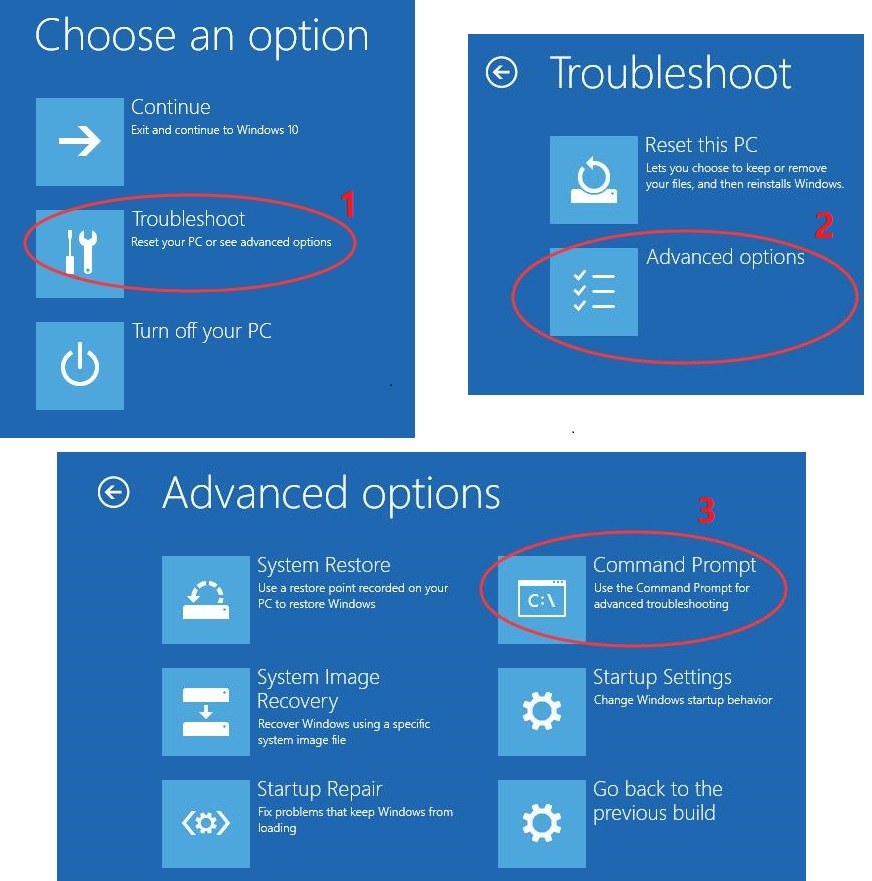
Type the following commands and hit Enter to run them one by one:
• cd C:\Program Files
• attrib WindowsApps -h
• rename WindowsApps WindowsApps.old
Reboot your Windows 10, then run System Restore again.
That’s it!
Also read:
- [New] 2024 Approved From Silence to Sounds Recording with Audacity on a Mac
- [New] A Comprehensive Insight Into BenQ’s BL2711U - Pioneering the 4K Standard
- [New] In 2024, Master iPhone Photo Watermarks The Top Apps Reviewed
- [New] In 2024, Mastering Social Media Top 10 Ingenious IGTV Methods for Brands
- Bricked Your Xiaomi Redmi Note 13 5G? Heres A Full Solution | Dr.fone
- Decoding the Mystery of Windows Update Error 0X8024200D: Fixes & Best Practices for Successful Updates
- Expert Tips for Resolving Non-Responsive PS4 Headset Mic
- Fixing the Issue: Why Is 'Copy & Paste' Malfunctioning in Windows 11?
- Fixing the Issue: Why Your PC Won't Boot Up
- How to Remove Forgotten PIN Of Your Samsung Galaxy A23 5G
- Leading 10 Capture Applications for Online Tutorials
- Lösungsansätze Für Das Problem Mit Der HEVC-Abspielfähigkeit Auf Ihrem PC - Tipps Zur Fehlerbehebung
- Resolve LiveKernelEvent Type 144 Mistake
- Resolved: Issue with Windows Unable to Access System Event Notification Service
- Run the Latest Engine Successfully? Upgrade to a GPU that Works with Direct3D 11!
- Solve Your PDF Printing Problems: Top Tips & Solutions
- Solved: Resolving Miracast Issues with Unsupported Graphics Drivers
- The Ultimate Solution for When Windows Update Fails to Launch
- Top Mobile Phone Bargains on Independence Day: Unbeatable Promotions From ZDNet
- Title: Easy Steps to Correctly Address Stop Work Order for Windows Host Process Using Rundll32
- Author: Ronald
- Created at : 2024-10-21 22:18:11
- Updated at : 2024-10-24 16:35:58
- Link: https://common-error.techidaily.com/easy-steps-to-correctly-address-stop-work-order-for-windows-host-process-using-rundll32/
- License: This work is licensed under CC BY-NC-SA 4.0.